Summary
Welcome to Panotracks’ Panorama Workshop! Spherical panorama photography (“pano”, for short) is an exciting and challenging area of photography. A lot of people call these panos “immersive”, because they are usually interactive, and your audience can view 360º around a circle as well as directly up and down in the view. Here’s an outdoor shoot I did at a local nature preserve:
Spherical Panorama of a Sunset at the Circle B Nature Preserve
There’s a lot of trial and error when you first get started doing spherical panos because there are a lot of different ways to go about making them. Some ways are more automated than others, and you can get fairly good results using these automated tools (which we’ll talk more about in a later post). But you need to put in a little manual effort if you want to get those really crisp, sharp and nicely lit panos.
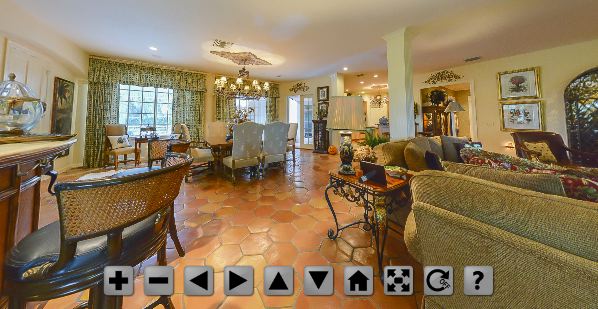
Family Room in a Luxury Home in Lakeland, Florida
In this tutorial series, I’ll outline a workflow that works great for me. In later posts, I’ll go into more detail on the steps below. What’s here is enough point you in the right direction for now, though. If you’re just getting started shooting spherical panos, it might seem like there’s a lot of information you need to know even before you walk out the door and start shooting. Well, you’re right. The best thing to do is to follow the process step-by-step and learn one technique at a time. Otherwise, it can get to be a little overwhelming. I liken this kind of photography to jumping into the really deep end of the pool. And it’s easy to sink or swim if you try to do too much at once.
You’re going to need the right camera equipment and software to shoot successful spherical panos. Spherical panos are a little more involved than other types of panos (e.g., planar and cylindrical), because the right kind of tripod head can help make or break your shoot. You also need to be pretty good at Adobe Camera and Photoshop, because there’s usually at least some retouching needed for most panos. It helps to know something about HDR photography as well. This because in a pano, you’re shooting in all directions, so you can have dramatic differences in exposure as you go around the scene. HDR can help you reduce those variations. The example above of the Family Room in a Luxury Home is a great example, which would not have been possible without HDR. You’ll probably also want to use Camera Raw for post-processing after you render your panorama source image, and Photoshop to remove your tripod from the bottom (“nadir”) view.
Let’s first talk about the hardware and software you need to get started. Feel free to comment below if you have questions.
Camera Equipment for Panorama Photography
You’ve got a lot of options in panorama equipment, ranging from cheap to expensive. You don’t have to have high-end expensive equipment to get great panos, though. If anything, that equipment might make certain tasks a little easier, but sometimes the ease of use isn’t worth the additional expense. The times when you want the high-end equipment might be when you’re going pro, when your time is at a premium.
The minimum setup you need if you’re going to follow my workflow is a full-frame camera, a 15- or 16-mm full-frame fisheye lens, a sturdy tripod and a panorama head. On Nikon, your two best lens options are either the Nikon 16 mm fisheye or the Sigma 15-mm fisheye, both full-frame DX lenses. I also use a Sigma 8 mm circular fisheye for doing 4-shot panos.
- Nikon D800 Camera
- Nikon 16 mm Full-Frame Fisheye Lens
- Sigma 8 mm Circular Fisheye
- Gitzo Tripod
- Really Right Stuff Panorama Head
Software Needed for My Panorama Photography Workflow
After you shoot your images, you’re going to need the right software to stitch your photos into a panorama. You’ll also need a program to convert the pano into a format that can be viewed in one of the many viewers available. Eventually, you’ll probably want to get your pano on the web, so you’ll also need a basic HTML editor and an FTP client to upload it to your website. There are other options for getting your pano online that mostly automate the last two steps, but I’ll cover those on a later post. If you want to take a quick peek at those services, the one I use is 360cities.net.
- Photo Mechanic-importing and tagging photos with GPS and metadata
- Abobe Photoshop and Bridge-Camera Raw, organizing and post-processing
- EnfuseGUI-HDR batch processing of images prior to stitching
- Photomatix-alternative option for HDR batch processing of images prior to stitching
- PTGui-stitches your photos (Hugin is a free alternative, but it’s not as intutive)
- KRPano Tools-extract and reassemble cube face (don’t worry, this will make more sense later)
- Panotour Pro-converts your pano source image into a format readable by an interactive viewer)
- Audacity-prepare sound files to add to your panos
- HTML Editor (Tincta)-editing parts of your HTML for SEO, branding, etc.
- FTP Client (Transmit)-uploading your pano to your website or server
PTGui Plugins Needed
The main software program for organizing and stitching your images PTGui. PTGui standard features are extremely effective for working with your images. PTGui, however, can be extended using several different plugins that give you additional options for stitching and blending. These plugins are helpful, because sometimes you have a project that doesn’t turn out very good with the standard set, but that works much better when using one of these plugins. These plugins have to be manually installed, but the instructions for all of them are easily found on the PTGui website.
- PTOptimizer-helps optimize control points in your image for successful blending
- PTStitcher/Nona-alterative stitching option
- PTStitcherNG-alterative stitching option
- Enblend-blends images so that it’s hard to tell where they overlap
Final Comment on Hardware and Software
There are free options available for most of these programs above. The main feature the paid software versions give you is a more intuitive experience. The paid software also gives you a trial period in which you can test all the features before you decide to buy.
There you have-all the basic setup information you need for shooting spherical panoramas. In the next tutorial, I’ll go into more detail on the camera equipment and walk through step-by-step how I go about a shoot.


Leave a Reply to John Couch Cancel reply